Top Painting Failures You Should Avoid
When you’re ready to paint, proper technique goes a long way in making sure your room turns out perfect. The last thing you want is paint issues on your wall. The three P’s of a good paint job are preparation, patience, and procedure. If your work lacks one of the three P’s, you can end with one of the three most common painting problems. But don’t worry! We’re here to help you avoid those paint failures.
1. Lacking Preparation
A Gritty Finish
If your paint job ends up looking and feeling gritty, something got into your paint before (or while) you used it. Stirring your paint properly helps to keep any bits of paint from clumping, and if you’re using old paint, it should be strained before you apply it to prevent paint failure. Also, your work area needs to be prepared to ensure that floating or windblown dust or grit can’t get introduced to the paint either in the can or cause paint issues on the wall while it is still wet. Having a clean wall goes a long way, so wash it with a soapy water solution first. You also will want a well-ventilated work area, but you make sure your open window isn’t providing a vector for the dust to enter the room.
To fix a gritty paint issue on the wall, you’ll need to sand the base smoothly again. Use a vacuum brush attachment to go over the area to remove the paint dust, then follow up with a soft cloth (microfiber is great for this) to catch anything left behind. Double-check your paint to ensure that there are no impurities in it, then repaint the area with your topcoat color.
A Blistering Wall
When the paint is no longer adhering to your wall, pockets of heat or moisture can get trapped causing blistering, or bubbling paint failures. Your first thought may be that this is a sign there’s water damage in your house, but before you go contacting the plumber, check to make sure it’s not just this common paint problem. Open the bubbles and if water isn’t coming out of any of them, you may just have a paint failure on your hands. Don’t sweat! The fix is easy! Simply sand the problem areas, and repaint with primer and color.
The key to this common paint problem is proper room preparation. Blistering paint happens most often in rooms that see excess heat and/or moister. We are talking bathrooms and kitchens. Make sure your room is cool and dry before, during, and after painting. You likely will have a window open, so avoid painting on particularly humid days. You also never want to apply oil-based paint on latex paint. That’s a surefire way to encourage blisters. And finally, if you know your room will see lots of heat and moisture, save yourself the headache and put a protective finish on your paint job. This will be similar to exterior paint that endures the seasons.
Disheartening Color Results
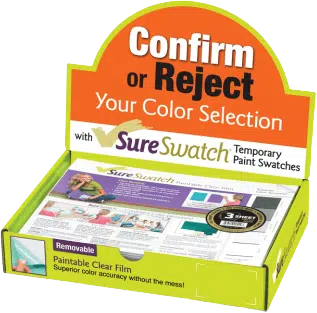
Time and time again people will put so much dedication and effort into painting a room, only for it to dry and be unsatisfied with the color. This common paint problem is maybe the easiest to avoid. First off, never skip buying a paint sample. The color chips you see at the store are made out of ink whereas paint uses colorant pigments. Because they are different mediums, the final color will also be different. That’s why it’s so important to get a paint sample. If you are hesitant to paint a sample on your wall, you can always opt for a product like SureSwatch Peel-and-Stick Paint Sample Sheets. It’s a removable film that you paint your sample on and then adhere to your wall. Whatever format you choose, the important part is to see the sample paint in your space.
Additionally, you should never skip out on primer. A room with and without primer can yield very different results. The primer helps give your wall a clean slate and prevent paint failure. This is particularly important when you are painting a room that previously had color. You also will get a bolder, more vivid final color if you opt for primer. That’s the goal, isn’t it?
2. Lacking Patience
A Wrinkled Finish
Adding a new coat of paint to a painted surface that isn’t yet dry will cause the paint to warp, as the two layers will be drying at uneven rates. This creates a wrinkled look to the painted surface. There’s really nothing that you need to actively do to prevent this paint issue on the wall — you just need the patience to let each coat dry fully before painting the next.
If the paint problem is really bad, you should strip the affected area entirely before sanding. To strip the paint problem, gently use a wired brush over the affected area. If it’s minor, you’ll probably be able to get away with just sanding the area smoothly again. Finish by repainting that area.
Efflorescence Discoloration
Efflorescence is when your paint has white salt deposits causing a stain-like appearance, mostly on the edges, almost like an old dirty baseball hat. Gross! This happens commonly on masonry surfaces, like brick, but is still a paint problem. Paint failure is seen most often with home improvement projects involving drywall. You have to give the wall sufficient time to completely dry and set before painting. Trying to speed up this process will only cause paint issues on the wall down the road.
The only real way to get rid of this paint problem after it occurs is by cleaning it. Use a wet sponge with an acidic solution (use a 1:20 ratio of white vinegar to water) to remove the deposits and then wipe dry. But you’re not quite done yet. Without prevention, you will be periodically cleaning that wall forever. You should seal the surface with a primer that is designed for efflorescence. Taking the time to paint it properly will prevent paint problems in the future.
3. Lacking Procedure
Drippy Paint
If you have dried paint drips on your walls, there was a problem with how you painted. You probably overloaded the brush or roller with paint, creating an uneven coat. Even if it looked OK at first, when you gave it time to dry, the areas where the paint was thicker had time to drip down before they dried, creating characteristic streaks and blobs. Paint problem areas often include around trim and in corners, where extra paint gets added to make sure it covers all the surfaces. The majority of the wall could be fine, with drips only occurring in the corners. To deal with drippy paint problems, use a flat-bladed scraper to peel each drip away. Sand the area smooth with fine-grit paper, then touch up the top coat.
Cracking and Peeling Paint
Sometimes paint will crack and peel even if it’s not particularly old. Cracking can form on the entire wall or just in small spots. This common paint problem forms when the paint was applied too thin, and is more likely to occur when you skip out on primer. You shouldn’t try to get through the paint application with just a single coat. This will lead to damage, like cracking and peeling, and more work for you in the end. You want to start every paint job with primer and make each coat even. Having paint too thin can not only cause cracking but also can make the color appear less vibrant than what the color chip promised. To fix this paint failure, you need to first sand off the cracking paint. After, you can just simply prime and repaint!
Put Your Skills to the Test
Many of the most common paint problems can be prevented. Using your three P’s, preparation, patience, and procedure, will ensure a proper paint job. Remember, putting in the effort to properly paint the first time around will have headaches in the end.

About the Author
Always a problem solver, Jamie Peltz looks at common everyday problems from a different perspective. After 17 years of working for a corporation, Jamie found herself unemployed. She saw this as an opportunity to follow her dream to become an entrepreneur. Over the years she and the team have received multiple patents and have been able to commercialize a few of their inventions.
Jamie is a graduate of The Ohio State University and received her MBA from John Carroll University. She also participated in the Goldman Sachs 10,000 Small Business Program and is currently Treasurer for NAWBO- Cleveland (National Association of Women Business Owners). In addition to her work, she enjoys hiking and spending time with her family.

